This video explains what conference administrators need to do to get started with their app. It explains the documents administrators receive and what to do with them. It also suggests the first few steps administrators should take in processing and uploading data. And it lists resources for assistance.
This video explains and demonstrates some of the features and options available to you. Please explore our app and let us know which features you will use at your event.
This video instructs conference administrators how to access their app and its admin portal.
You can upload your user, agenda, and organization data from Excel. There are videos in the "Adding Data" section of this library that explain how to do so.
To facilitate upload, please make your Excel files match the data formats and column headers in our template files. These files are also available in the "Adding Data" section, and are the same as those already sent from Results at Hand support staff.
The Excel templates are contained in a folder within a zip file, and are available by clicking the button below.
Graphics
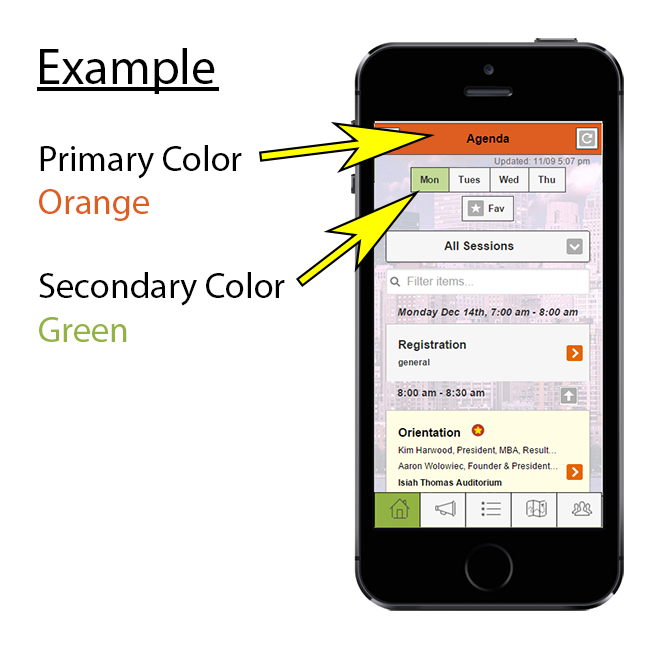
You brand's colors can be added to your app to make it your own.
The easiest way to do that is to simply tell us to apply colors based on your logo or your website, and we will take care of the rest.
Alternatively, please submit three colors, and we will apply them on our end. This website lets you select colors and provides both hexadecimal (preferred) or RGB values for each. It also lets you see how text will appear over your colors.
If you only have one or two colors, apply a lighter shade of the primary color or a neutral gray for the other colors.
The three colors are applied to the following elements:
- PRIMARY COLOR: Applied to the main header, and submenu tabs throughout the app.
- SECONDARY COLOR: Applied to various submenu tabs and buttons.
- TERTIARY COLOR: Rarely seen, applied to visited pages, completed questions, and special access buttons.
Your splash page will display briefly upon first load, and when a refresh occurs. Text should be kept to a minimum since users will not have time to read a lot of text before the home screen loads.
STANDARD APPS
Minimum size: 320px wide X 480px high.
You can upload your splash page in the portal under "Branding"/"Splash Page".
PREMIUM APPS
Vertical minimum size: 1536px wide X 2048px high.
Horizontal minimum size: 2048px wide X 1536px high.
Web app size: 320px wide X 480px high.
You can upload your web app splash page in the portal under "Branding/App Icon". Please submit the two large mobile sizes to us.
*Premium administrators please note that your splash pages must be in place before we can submit to Apple, and cannot be changed without a resubmission.
EXAMPLES


Horizontally aligned splash page example.
Vertically aligned splash page example.
STANDARD APPS
Minimum size: 114px X 114px.
Your icon will be displayed on users' devices when they save your web app to their home screen. Keep in mind that the icon will be very small on the users' menus, so it should contain a minimum of text and graphics.
You can upload your icon in the portal under "Branding"/"App Icon".
PREMIUM APPS
Mobile minimum size: 1024px X 1024px.
Web app minimum size: 114px X 114px.
Your icon will be displayed on users' devices when they download your app from the App Store or Google Play. Your icon will also be displayed on both store's app pages. But most user exposure to the icon will be on their devices, so it should contain a minimum of text and graphics.
You can upload your web app icon in the portal under "Branding"/"App Icon". Please submit the large mobile icon to us.
*Premium administrators please note that your icon must be in place before we can submit to Apple, and it cannot be changed without a resubmission.
Examples
Headers are page-wide banners near the top of your screen that display your event's main graphic.
Footers are page-wide banners near the bottom of your screen that display sponsor ads.
You can upload each in your portal under "Branding/Header Rotators" and "Branding/Footer Rotators".
Your app can include multiple headers and footers which will rotate as users visit the home screen.
- Standard Apps: One header and one footer included. Please contact us to include more.
- Premium Apps: Five headers and five footers included.
Height: This can vary, but should be somewhere between 85px to 125px high.
Width: In order for these banners to display across the screens of various size devices, without consuming too much vertical space, three widths are required for each banner:
- 800px
- 600px
- 400px
Each user's device will receive the banner best suited for its width. If you only have one banner prepared, use it for the 400px size, and simply place it atop a white background which is 800px and 600px wide.
Links: Your banners can be linked to either any external link on the web, or to an internal page within the app. If you are linking your banners, please indicate to the user that the banner is actually a button by adding text to it like "Click for More" or just "->".
- External Link: Simply copy and paste the URL in the portal's Add Rotator "Optional Link" field.
-
Internal Link: Copy and paste the web app page's URL, and paste that in the portal's "Optional Link" field. Then replace everything before and including ".com/" with just a "#". This will keep users within the native app, instead of opening via a web browser.
For example:
"http://mec.resultsathand.com/user/profile/1" becomes "#user/profile/1".
EXAMPLES
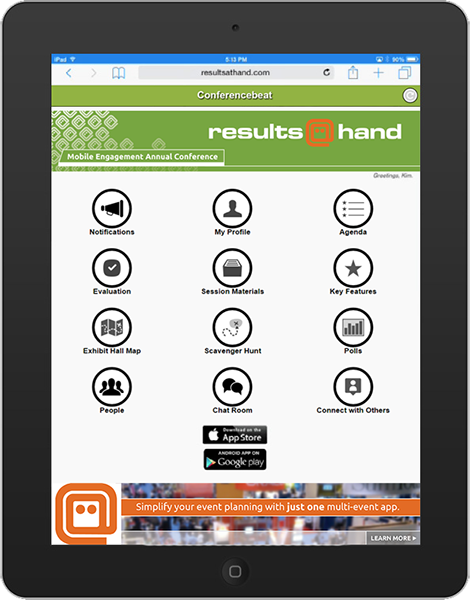
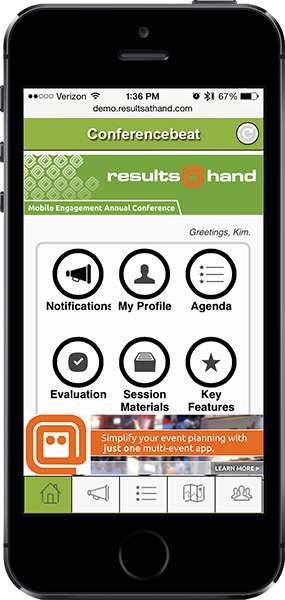
The following examples show how headers and footers of different widths display across devices of various sizes, such as a laptop, tablet, and phone. Notice how the graphics and text are slightly altered to accomodate each screen.
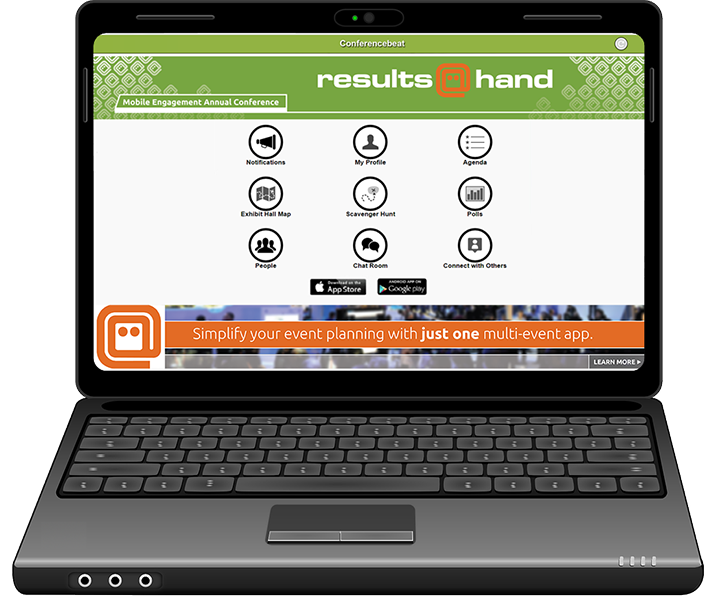
800px wide banners on a laptop.
600px wide banners on a tablet.
400px wide banners on a phone.
Adding Data
This video demonstrates how administrators can upload multiple users simultaneously through Excel. It explains the Excel file headings and options. It also explores how the new users will be displayed in the directory.
This video demonstrates how administrators can add or edit an individual user through the portal, and how it appears to users.
This video demonstrates how administrators can upload multiple agenda sessions to the portal via Excel. It also explains the various column headings in the Excel template file.
This video demonstrates how administrators can add a single agenda session, explains all the options, and shows the results on the user side.
This video demonstrates how administrators can add and edit organizations through the portal, both one at a time and as a batch through Excel. It also explores all the features and options involved.
Enhancing Data
This video demonstrates how administrators can establish relationships between users and various entities in the app. These include making users into sponsors, exhibitors, or hosts, and attaching speakers to sessions or teams.
This video demonstrates how administrators can assign keywords to sessions so as to filter the sessions displayed in the agenda. The video also shows how a user applies the filters.
This video demonstrates how administrators can add or manage agenda sections, or "tracks", for their app.
Special Features
This video demonstrates how administrators can create evaluations for their event through the portal. It shows how to manage question groups, which types of questions are available, how a user would see the evaluations, and how to download results.
This video demonstrates how administrators can upload session attachments, and how users can access them.
You may have opted to allow speakers to upload their own attachments. There is another video and pdf below intended for speakers which explains that process, which is different than the administrators' process. Please share that video with your speakers.
This video demonstrates how a speaker can log into the app and upload his or her presentation materials so that other users can download them. Please share this video with your speakers.
This video explains how you create a certificate with personalized user fields, upload it to your app, and how it appears to users. We explore how to add fields using either Adobe Acrobat or a free online tool.
This is a new premium feature which may not yet be included in your portal. If you would like it added, please contact us and we will be happy to add it. This feature can also quickly be added to standard apps for a fee.
Engaging Users
When your app has enough data, you will want to alert users that the app is ready and instruct them on where to find it, and what they can do once they log in.
We will provide you with a "getting started" message. It will look very much like this email template, but with the red text replaced with your app's specifics. You can edit as you like and distribute it to your users.
This video demonstrates how conference guests can access their conference app and update their profile. The email template above, and the first drop-down in the "FAQ" section of your app contains this same video.
This video demonstrates how administrators can add notifications through the portal, how to set the release time, gives formatting options, and shows how the user will see it.
This video demonstrates how you can create polling questions for a session and display the results, all during the presentation. Please share this video or the accompanying PDF with your speakers.
This is a premium feature which can be quickly added to standard apps for a fee. Please contact us for more information
This video demonstrates Results @ Hand's exclusive networking feature for conference apps.
This is a premium feature which can be quickly added to standard apps for a fee. Please contact us for more information.
This video explains how sponsors and exhibitors of conferences will benefit using the ConferenceBeat app by Results at Hand. It explains all the awareness opportunities and options and demonstrates how a user will see each.
Some of these are premium features which can be quickly added to standard apps for a fee. Please contact us for more information.
You can opt to allow sponsors and exhibitors to edit their own company's app page. If you do, you can share this PDF which instructs them how to do so.
Further Support
You are welcome to contact us for further assistance.